The common belief that logging long-distance miles in the UK fully prepares you for the Tour du Mont Blanc is a dangerous misconception.
- Success in the Alps is dictated by your ability to manage massive daily vertical elevation and the resulting eccentric load on descent, not horizontal distance.
- Alpine-specific challenges like predictable afternoon thunderstorms, complex hut booking systems, and different mapping conventions require new strategies, not just more fitness.
Recommendation: Shift your training focus from distance to vertical gain and adopt the specific alpine planning techniques outlined in this guide to bridge the gap between UK hillwalking and European trekking.
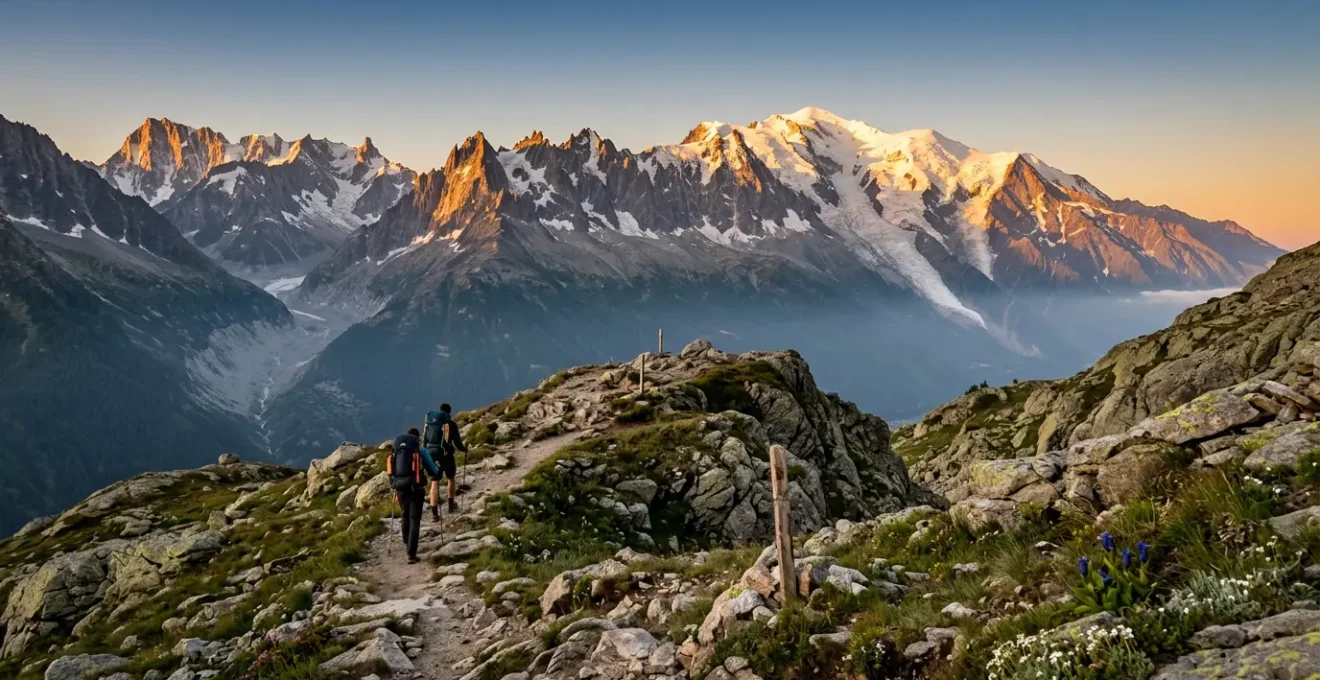
As an active British hillwalker, you’ve likely spent years conquering the peaks of Snowdonia, the Lake District, and the Scottish Highlands. You can comfortably handle a 20km day, navigate with an OS map, and you own a reliable set of waterproofs. You feel ready for the next step: a legendary European trek like the Tour du Mont Blanc. But there’s a persistent, nagging feeling of being underprepared for the sheer scale of the Alps. This feeling is your most important guide, because the skills that make you competent in the UK are only the starting point for the Alps.
Many guides will give you a generic packing list and tell you to “get fit.” They might mention the route is about 170km with roughly 10,000 meters of ascent. But these numbers fail to capture the fundamental difference in the challenge. It’s not just a longer walk; it’s a different sport. The crux of the issue isn’t the distance you can cover, but how your body, gear, and planning hold up to relentless, day-after-day vertical gain and loss that is simply unavailable in the UK.
But what if the key to a successful transition wasn’t just training harder, but training smarter? What if the secret lies not in adding more miles, but in understanding and mastering the non-obvious metrics of alpine trekking? This guide moves beyond the platitudes. As an International Mountain Leader who specialises in this exact transition, I’m going to deconstruct the critical alpine factors that UK walkers often underestimate. We will explore why elevation is more dangerous than distance, how to manage the inevitable physical toll, and the specific logistical and environmental strategies required to not just survive, but thrive on the Tour du Mont Blanc.
This article is structured to build your alpine competence systematically. We’ll start with the physical demands, move to equipment and logistics, cover environmental factors, and finish with the mental resilience needed to complete this iconic journey. Follow along to transform your UK hillwalking experience into a solid foundation for alpine adventure.
Summary: A UK Walker’s Guide to Mastering the Alps
- Why Ignoring Elevation Gain Profiles Is More Dangerous Than Distance?
- How to Manage Severe Blisters on Day 2 of a 10-Day Trek?
- Trail Runners vs Heavy Boots: Which Is Better for Groomed Alpine Paths?
- The Refugio Booking Mistake That Forces You to Sleep on the Floor
- When Should You Start Your Daily Ascent to Avoid Afternoon Thunderstorms?
- How to Layer Merino Wool Clothing for Sub-Zero Mountain Mornings?
- How to Read a Physical OS Map When GPS Fails Completely?
- Beyond the Trail: What Patagonia Teaches Us About Alpine Resilience
Why Ignoring Elevation Gain Profiles Is More Dangerous Than Distance?
For a UK hillwalker, a “big day” might involve 400m of ascent. On the Tour du Mont Blanc, you will regularly face days with over 1,200m of climbing, immediately followed by a similar descent. Your focus must shift from horizontal kilometres to a vertical meter mindset. A 16km day on the TMB is not equivalent to a 16km walk in the Peak District; it’s an entirely different level of physical stress. The danger lies in underestimating the cumulative impact of this verticality.
The single most underestimated factor is the eccentric load during long descents. This is the braking force your quadriceps exert with every downhill step. While climbing feels harder on your lungs, descending is what causes microscopic muscle tears, leading to Delayed Onset Muscle Soreness (DOMS) that can cripple your trek two days later. An unprepared walker can feel fine after a huge descent, only to wake up 48 hours later unable to walk downstairs in the refuge.
Case Study: The TMB’s Day 2 Elevation Trap
The second day of the classic TMB route, from Les Houches to Les Contamines, perfectly illustrates this danger. The distance is a manageable 16km, but it involves a staggering 1,400m ascent to the Col du Tricot, followed by a brutal 1,200m descent. Many UK walkers, conditioned for gentle 300-400m elevation days, report severe quad pain and an inability to continue by day three. They covered a familiar distance, but the eccentric load from the descent caused debilitating muscle soreness that peaked 48 hours later, sabotaging the rest of their trip.
To avoid this, you must learn to read an elevation profile not as a simple line, but as a detailed plan of energy expenditure. Training must include back-to-back days with significant descents to condition your muscles for this specific type of load.
Your Alpine Elevation Profile Analysis Method
- Calculate Effort-Equivalent Distance: Use Naismith’s Rule as a baseline. Add 1 hour to your flat walking time for every 600m of ascent to understand the true time commitment.
- Identify ‘Killer Sections’: Scan the profile for gradients exceeding 20% for more than 500m of continuous climbing. These are your red zones for pacing.
- Mark ‘False Flats’: Locate sections with a 3-7% gradient. They appear level but are deceptively draining. Plan for them.
- Locate Recovery Zones: Find sections with a gradient under 5%. These are your designated stops for nutrition and hydration to manage energy spikes.
- Estimate Eccentric Load: As a rule of thumb, multiply the total meters of descent by 1.5. This gives a conceptual figure for the quad muscle impact you need to prepare for.
How to Manage Severe Blisters on Day 2 of a 10-Day Trek?
Blisters are the number one trip-ender in the Alps. On a multi-day trek with massive elevation changes, your feet swell, shift, and sweat in ways they never do on a weekend walk. A small hotspot on day one can become a debilitating, raw wound by day three, making every step an agony. The key is to move from a reactive “treat it when it hurts” mindset to a proactive foot-care protocol. This begins the moment you feel the slightest friction, known as a “hotspot.”
Your first aid kit needs to be a dedicated foot care system, not an afterthought. Standard plasters are useless. You need specialist materials like tincture of benzoin to make tape stick to sweaty skin, hydrocolloid dressings for developed blisters, and sterile lancets for safe draining. Treating a blister is a clinical procedure you must be prepared to perform in a mountain hut dormitory.
The image above shows the essential components of a serious alpine foot care kit. These aren’t just for emergencies; they are tools for daily maintenance. Every evening in the refuge, your routine should include airing your feet, checking for pressure points, and pre-taping any areas of concern for the next day. This preventative action is far more effective than any treatment after the fact.
Here is the emergency protocol for when a blister does form, broken down by stage:
- Hotspot Stage: Stop immediately. Apply tincture of benzoin to the area, let it dry until tacky, then cover with a non-stretch tape like Leukotape or zinc oxide tape in overlapping strips.
- Small Blister (<5mm): Do not pop it. Create a ‘donut’ pad from moleskin or foam to take pressure off the area. Place a hydrocolloid dressing (like Compeed) directly on the blister inside the donut, and secure everything with tape.
- Large, Tense Blister (>5mm): If the blister is large and likely to burst anyway, it’s better to drain it in a controlled way. Sterilize a needle or lancet with an alcohol wipe. Puncture the blister at its base in a couple of spots. Gently press out the fluid, but leave the roof of skin intact. Apply an antiseptic, cover with a non-adherent sterile pad, and secure firmly.
- Nightly Recovery: Upon arriving at the refuge, soak your feet in cold water for 10 minutes if possible. Let them air dry completely, massage with a moisturiser, and pre-tape any known pressure points for the following day.
Trail Runners vs Heavy Boots: Which Is Better for Groomed Alpine Paths?
The conventional wisdom for UK hillwalking often defaults to sturdy, waterproof leather boots. For the well-trodden paths of the TMB, this can be a serious mistake. The debate between heavy boots and lighter trail running shoes is not about which is “better,” but which is the right tool for the job. On groomed alpine trails, energy preservation and reduced joint stress often outweigh the need for maximum ankle support.
A heavy boot can feel like a ball and chain by the end of a 1,200m ascent. The extra weight significantly increases your energy expenditure with every single step. More critically, the rigid sole and ankle cuff can transfer massive stress to your knees on long descents. While they offer protection, they can contribute to the very injuries they are meant to prevent. Trail runners, by contrast, are lighter, more flexible, and encourage better proprioception, allowing your feet and ankles to adapt naturally to the terrain. They also dry infinitely faster after a downpour or a stream crossing—a crucial factor in preventing blisters.
This isn’t to say boots have no place. If you are carrying a very heavy pack (over 15kg), trekking in early or late season with a higher chance of snow, or have a history of severe ankle instability, a lightweight, modern hiking boot might be a better compromise. But for the majority of trekkers on the TMB in summer, the trend is overwhelmingly towards trail runners or light hiking shoes.
This decision is backed by stark data. According to 2024 Alpine rescue data, 73% of Tour du Mont Blanc evacuations are due to knee injuries, not twisted ankles. That same data indicates that wearing heavy boots can increase stress on the knee by up to 23% with every step on a descent. This context is vital when making your choice.
To help you decide, this table breaks down the key factors based on a comparative analysis of alpine footwear:
| Factor | Trail Runners | Light Hiking Boots | Heavy Mountain Boots |
|---|---|---|---|
| Weight (per pair) | 600-800g | 900-1200g | 1400-1800g |
| Ankle Support | Minimal – relies on proprioception | Moderate – flexible support | Maximum – rigid structure |
| Break-in Period | 0-2 days | 5-10 days | 15-30 days |
| Drying Time | 4-6 hours | 8-12 hours | 24+ hours |
| Energy Expenditure | Baseline | +5-7% energy cost | +10-12% energy cost |
| Best For TMB | Fast hikers, dry conditions | Most hikers, mixed conditions | Heavy loads, wet conditions |
The Refugio Booking Mistake That Forces You to Sleep on the Floor
The advice to “book your TMB refuges early” is common knowledge. The critical mistake UK walkers make is not understanding *how* to book strategically. Simply going to individual refuge websites in February for a July trek will often result in finding them “fully booked.” This is because a significant portion of beds are held back for members of national alpine clubs. Not joining one is the single biggest booking error you can make.
For a modest annual fee, joining an alpine club with reciprocal rights (like the Austrian Alpine Club’s UK branch) transforms your status from a regular tourist to a member of the mountain community. This grants you access to pre-reserved bed allocations, significant discounts (often up to 50%) on overnight stays, and in some cases, priority booking windows. This system is the backbone of alpine hut culture and largely invisible to outsiders. Trying to book the TMB without it is like trying to get a dinner reservation by walking in off the street when half the tables are reserved for regulars.
Being a member doesn’t just get you a bed; it gives you flexibility. If plans change, it’s often easier to secure a spot in an alternative hut. Furthermore, many memberships include mountain rescue insurance, covering helicopter evacuation—a vital piece of security. The small investment pays for itself within just a few nights of discounted lodging.
Case Study: The Austrian Alpine Club Advantage
British hiker Sarah joined the UK branch of the Austrian Alpine Club (for around £51 per year) in January before her July TMB trek. This membership provided her with a 50% discount at most affiliated huts, priority booking status, and comprehensive rescue insurance. When the popular Refuge du Col de la Croix du Bonhomme was showing as fully booked for the public, Sarah was able to secure a bed through the reserved member allocation. Over her 11-night trek, her total savings on accommodation alone exceeded £200, more than covering the membership cost four times over.
When Should You Start Your Daily Ascent to Avoid Afternoon Thunderstorms?
In the UK, a forecast of “afternoon showers” might mean packing a waterproof jacket. In the Alps, it’s a serious safety warning. Summer weather follows a predictable pattern: clear, cold mornings give way to convective heat buildup, forming powerful thunderstorms that roll in between 2 PM and 4 PM. Being caught on an exposed high col or ridge during one of these storms is extremely dangerous due to the risk of lightning strikes and rapid temperature drops. The key is not to avoid bad weather, but to plan your day around its predictable cycle.
Your goal every day should be to be off the highest, most exposed ground by 1 PM at the absolute latest. This requires a complete reversal of the leisurely start common in UK hillwalking. On the TMB, a 6:30 AM or 7:00 AM start is not early; it’s normal. This strategy is called “walking with the sun.” You ascend in the cool, stable morning air and descend as the heat of the day builds, reaching the safety of the valley or the next refuge before the weather turns.
This requires a simple but disciplined planning process each evening:
- Night Before Check: Review the next day’s weather forecast and identify the highest point (e.g., Col de la Seigne at 2516m) on your map.
- Calculate Your ‘Safe’ Arrival: Set a target to be at that highest point no later than 1 PM.
- Estimate Your Time: Work backwards from your 1 PM target. Use a baseline of 300m of elevation gain per hour, plus 4km per hour on the flat, to estimate your hiking time.
- Add a Safety Buffer: Subtract an hour from your calculation to account for breaks, photo stops, and a potentially slower morning pace. This is your departure time.
- Morning Observation: Before you leave, look at the sky. If large, puffy cumulus clouds are already forming before 9 AM, the atmosphere is unstable. Leave 30 minutes earlier than planned.
Even with the best planning, you can get caught out. Knowing the immediate action drill is critical. The Alpine Safety Institute provides clear, life-saving advice:
The ’30/30 Rule’ is critical in the Alps – if thunder follows lightning by less than 30 seconds, you’re within strike range. The only safe response is to descend immediately to treeline or seek proper shelter, then wait 30 minutes after the last thunder before continuing.
– Alpine Safety Institute, TMB Weather Safety Guidelines 2024
How to Layer Merino Wool Clothing for Sub-Zero Mountain Mornings?
The temperature swing on a typical TMB day can be immense, from below freezing on a 4 AM start to over 20°C in a sunny valley by midday. Your UK layering system, likely built around a fleece and a hardshell, is inadequate for this range. The alpine solution is a dynamic merino wool system, where you constantly adjust thin layers to manage moisture and temperature with precision.
Merino wool is the material of choice for its incredible properties: it insulates when wet, wicks moisture away from the skin, and is naturally odour-resistant, which is essential on a multi-day trek. The mistake is thinking of it as just a “base layer.” A true alpine system uses multiple weights of merino that are added or removed according to a strict protocol. The goal is to never get sweaty, as sweat cools and chills you the moment you stop moving, rapidly increasing the risk of hypothermia.
Your layering strategy should be a fluid process throughout the day:
- Pre-Dawn Start: Begin hiking wearing only your lightest merino base layer (e.g., 150gsm). You will feel cold for the first ten minutes, but you will warm up rapidly as you ascend. Starting with too many layers is a rookie error that leads to sweating.
- Active Hiking Above Treeline: Once you are moving and generating heat, add only a lightweight, breathable windshell over your base layer. This protects you from wind-chill without trapping moisture.
- Rest Stop Protocol: This is the most critical moment. BEFORE you stop for a break, immediately put on your mid-layer (e.g., a 200gsm merino top or a light insulated jacket). This traps the body heat you’ve generated and prevents your sweat from flash-cooling you.
- Summit or Exposed Ridge: On the highest, coldest, and windiest sections, you might wear all your layers, including your waterproof hardshell as a final barrier. However, use all ventilation zips to avoid overheating.
- Refuge Arrival: The moment you arrive, strip off your wet hiking layers and change into a dry set of clothes, usually your mid-weight merino top, for the evening. Hang your wet layers immediately to dry.
Choosing the right weights is key to building this system, as this merino weight guide for typical TMB summer conditions shows.
| Merino Weight | Temperature Range | TMB Use Case | Drying Time |
|---|---|---|---|
| 150gsm | 10°C to 20°C | Active hiking base layer | 4-6 hours |
| 200gsm | 0°C to 10°C | Morning starts, evening wear | 6-8 hours |
| 260gsm | -5°C to 5°C | Early season, sleep layer | 8-10 hours |
| Neck Gaiter | Any | Instant warmth regulation | 2-3 hours |
How to Read a Physical OS Map When GPS Fails Completely?
Your proficiency with a British Ordnance Survey (OS) map is a valuable skill, but it can create a dangerous false confidence in the Alps. When your GPS fails due to a dead battery or satellite issues in a deep valley, your life depends on your paper map and compass. The problem is, a French IGN (Institut Géographique National) map is not an OS map. They use different symbols, different contour systems, and a different visual language. Believing they are interchangeable is a critical error.
One of the most significant differences for a UK walker is the trail marking. On an OS map, a public right of way is often a green dashed line. On an IGN map, the main long-distance (GR) trails are marked with bold red dashed lines, while a local variation like the TMB might be shown with green dots. Confusing these systems could send you onto a completely different long-distance path heading in the wrong direction. Similarly, contour intervals can differ. You must check the map’s legend to confirm if contours are every 10m or 20m, as this drastically changes your perception of slope steepness.
Your first step upon arriving in Chamonix should be to buy the relevant IGN maps and spend an evening comparing them to your home OS maps. Identify the key differences in the legend for paths, huts, and water features. This simple act of familiarisation can be a lifesaver.
Case Study: Lost in Fog at Col du Bonhomme
British hiker James, an experienced OS map user, became disoriented in thick fog at the Col du Bonhomme (2483m) when his phone died. Using his paper IGN map, he initially struggled, noticing the contour interval was a consistent 10m, unlike the 5m/10m orange/brown system he was used to. Unable to see landmarks, he relied on fundamental navigation, using the main ridge line as a ‘handrail’ feature. He followed it east until he hit the obvious ‘catching feature’ of the path junction leading to the refuge. His key lesson was realising that the TMB route was marked with green dots, a symbol he would have ignored on an OS map.
Key Takeaways
- UK fitness doesn’t directly translate; alpine success depends on managing daily vertical gain and the resulting muscle load.
- Proactive management of feet, gear, and daily schedules is more critical than reactive problem-solving on the trail.
- Leveraging alpine-specific systems—like hut club memberships and understanding foreign map conventions—is a requirement, not an option.
Beyond the Trail: What Patagonia Teaches Us About Alpine Resilience
You can perfect your training, gear, and logistics, but the Alps will inevitably test your mental fortitude. You will have days of driving rain, biting wind, and soul-destroying climbs that feel endless. This is where the final piece of the transition from UK hillwalker to alpine trekker clicks into place: psychological resilience. The ability to reframe discomfort and persevere is what gets you to the next refuge.
It’s helpful to put the TMB’s challenges into a global perspective. While it is a serious undertaking, it is a well-marked, well-supported trail with huts providing food and shelter every night. It is not a wilderness expedition. Understanding this helps you contextualise a “bad day.” Research from the Alpine Weather Institute shows that 40mph winds at 10°C create a wind chill equivalent of -1°C, dramatically increasing caloric burn and hypothermia risk. This is a scientific fact you must respect with proper layering, but it’s also a manageable challenge.
Expedition leaders who operate in the world’s harshest environments, like Patagonia, have a refined perspective on what constitutes “difficult.” Their experience provides a powerful mental tool for TMB trekkers.
Patagonia taught me that discomfort is temporary but quitting is permanent. When you’re getting hammered by 70mph winds on the TMB’s exposed ridges, remember that Patagonian hikers face this daily. Your ‘terrible’ weather day is someone else’s normal.
– expedition leader Tom Harrison, Lessons from Patagonia Applied to Alpine Trekking
Embracing this mindset is transformative. It turns a miserable experience into a character-building one. It allows you to accept the temporary pain or cold, knowing it will end when you reach the warmth of the refuge. It’s the understanding that you are stronger than you think and that the feeling of accomplishment on the other side will far outweigh the fleeting hardship.
To put these strategies into practice, your next step should be to build a personalised training plan that specifically targets vertical gain and back-to-back hiking days, simulating the unique demands of the Alps.