Contrary to popular belief, your weekend fitness won’t save you on a multi-week tour; it’s a trap that encourages over-exertion on day one.
- The real challenge isn’t single-day endurance but managing the cumulative stress on joints and muscles from daily, loaded cycling.
- Success lies in mastering gradual adaptation, smart weight distribution, and metabolic pacing—skills rarely learned on short UK rides.
Recommendation: Treat your first three days as a mandatory adaptation period, riding at only 50-65% of your normal capacity, regardless of how good you feel.
You’ve conquered the Peak District, smashed a century ride in the Cotswolds, and your Strava profile proves you’re fit. So, a two-week, 500-mile jaunt across France with panniers should be a breeze, right? This is the most dangerous assumption a first-time tourer can make. I’ve seen it countless times: strong, capable cyclists, humbled and broken by day three, nursing swollen knees in a provincial French pharmacy. They didn’t lack fitness; they lacked an understanding of the single most important principle of long-distance touring: managing cumulative stress.
The advice you typically hear—”pack light,” “plan your route”—is true but superficial. It misses the fundamental physiological shift that occurs when you transition from unloaded weekend blasts to fully loaded, consecutive days in the saddle. Your body, especially your tendons and stabiliser muscles, has never experienced this kind of relentless pressure. Pushing hard on day one, fuelled by holiday excitement and your UK-honed fitness, is the fastest way to guarantee an injury that will shadow your entire trip.
But what if the secret wasn’t about being stronger, but about being smarter? This guide is built on that premise. We’re going to ignore the platitudes and focus on the specific, counter-intuitive strategies that allow a cyclist’s body to adapt and thrive over hundreds of miles. We will explore why starting slow is non-negotiable, how the precise placement of your gear can make or break your balance, and how to fuel for the long haul, not just the next hill. This isn’t just about surviving your first tour; it’s about finishing it stronger, wiser, and already planning the next one.
This article provides a structured roadmap to help you transition from a weekend rider to a confident continental tourer. The following sections break down the critical knowledge you need to protect your body and fully embrace the adventure.
Summary: A Beginner’s Survival Guide to European Cycle Touring
- Why Pushing for 60 Miles on Day One Destroys Your Knees?
- How to Distribute 15kg of Gear Across Your Panniers Without Losing Balance?
- Gravel Bikes vs Dedicated Touring Frames: Which Handles Cobblestones Better?
- The Hydration Error That Causes Severe Alpine Leg Cramps
- When Is the Safest Time of Day to Tackle Narrow Alpine Ascents?
- In What Order Should You Schedule Muscle-Intensive Activities?
- E-Bike Tours vs Minibus Excursions: Which Offers a Better Tasting Pace?
- How to Plan a 14-Day Outdoor Activities Road Trip Across the Scottish Highlands?
Why Pushing for 60 Miles on Day One Destroys Your Knees?
The single biggest mistake a fit cyclist makes on their first tour is treating day one like a typical Sunday ride. Your cardiovascular system might be ready for 60 miles, but your connective tissues are not. When you add 15kg of gear and remove the possibility of a full recovery day, you introduce a low-level, continuous strain that your knees, hips, and back have never had to manage. This is the essence of cumulative stress. Pushing your usual distance on the first day doesn’t build a foundation; it digs a hole of inflammation and micro-trauma that you’ll spend the rest of the trip trying to climb out of.
Think of it as structural adaptation. Your muscles are elastic and recover quickly, but your tendons and ligaments are tougher, less vascular, and adapt far more slowly. They need to be gradually introduced to the new, sustained load. A cyclist like Jin, who embarked on a 13-year, 60,000km world tour with very little prior touring experience, succeeded precisely because she embraced this principle. She started slow, listened to her body’s signals, and allowed it to adapt over weeks, not days. For your first tour, the goal of the first 72 hours isn’t to make progress on the map, but to allow this structural adaptation to begin without causing injury.
Respecting this initial phase is non-negotiable. It feels counter-intuitive to hold back when you feel fresh, but it’s the most professional and strategic decision you can make. It’s the difference between a painful two-week ordeal and a lifetime of incredible touring adventures.
How to Distribute 15kg of Gear Across Your Panniers Without Losing Balance?
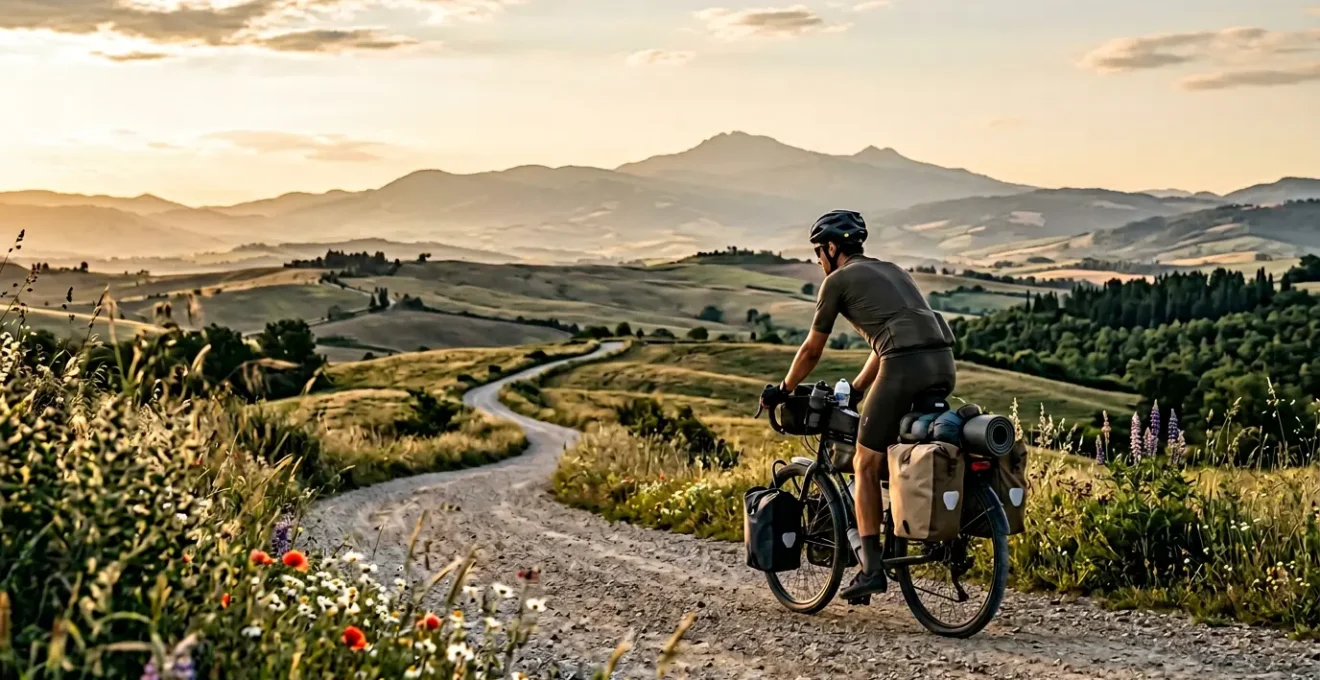
Once you’ve accepted the need for physical pacing, the next step is mastering your load. How you distribute that 15kg of gear is as critical as what you pack. Poor weight distribution doesn’t just make the bike feel sluggish; it fundamentally alters its handling dynamics, increases muscle strain, and can become a serious safety hazard, especially on challenging terrain. The common beginner mistake is to load everything onto the rear rack, making the bike “tail-heavy.” This lightens the front wheel, causing it to feel skittish on climbs and lose traction in fast corners.
The professional approach is to aim for a balanced distribution, with a significant portion of the weight on the front. A common starting point for flat terrain is a 40/60 front-to-rear split. This keeps the front wheel planted, improves steering stability, and balances the braking forces between both wheels. Heavy, dense items like tools, camp stoves, and food should be packed low and close to the bike’s centreline in both front and rear panniers. Lighter, bulkier items like a sleeping bag or clothes can go on top of the racks.
This distribution must be dynamic. As you encounter different European landscapes, from Dutch flats to Alpine climbs, you’ll need to adjust your setup. The table below outlines how to adapt your load dynamics for optimal performance and safety.
This approach to packing transforms your luggage from dead weight into an integrated part of the bike’s stability system, as detailed in this comprehensive analysis of weight distribution.
| Terrain Type | Front/Rear Distribution | Key Considerations |
|---|---|---|
| Flat Roads | 40/60 (front/rear) | Standard distribution for stability |
| Alpine Climbs | 45/55 | More front weight prevents wheel lift |
| Technical Descents | 35/65 | Lighter front for nimble steering |
| Crosswind Exposure | 40/60 | Balanced to minimize sail effect |
As you can see, a heavier front end is your friend on steep climbs, preventing the unnerving sensation of the front wheel lifting off the pavement with each pedal stroke. Conversely, on a winding, technical descent, shifting a little more weight to the rear frees up the front for more nimble and responsive steering. Mastering these subtle shifts is a key touring skill.
Gravel Bikes vs Dedicated Touring Frames: Which Handles Cobblestones Better?
The “right bike” debate is endless, but for a loaded tour on varied European surfaces, it boils down to a conflict between modern versatility and traditional robustness. Your weekend carbon road bike is out. The choice for a first-timer is typically between a trendy gravel bike and a classic steel touring bike. When faced with a stretch of Belgian or French *pavé* (cobblestones), the difference becomes starkly apparent.
A dedicated touring frame, almost always made of steel, is designed with one purpose: to carry weight comfortably and reliably over long distances. Its key features are a long wheelbase and relaxed frame angles (a slack head tube angle). This combination provides exceptional straight-line stability. When loaded with 15kg of gear, a steel tourer feels planted and predictable, absorbing road vibrations rather than transmitting them to your body. Steel’s natural compliance acts as a micro-suspension, which is a godsend on rough surfaces. They also feature a plethora of mounts for racks and mudguards, a non-negotiable for serious touring.
A gravel bike, on the other hand, is a jack-of-all-trades. It’s lighter, more agile, and often has a more aggressive, “sporty” geometry. While it can handle wider tyres, its shorter wheelbase and stiffer frame (often aluminium or carbon) make it feel much livelier and more responsive when unloaded. However, when you load it with panniers, that liveliness can become twitchiness. On cobblestones, the stiffer frame transmits more jarring vibrations, leading to greater rider fatigue. While many gravel bikes now come with rack mounts, they often lack the robust, integrated design of a true tourer, and their weight capacity can be lower.
So, which is better? For a pure, comfort-focused, heavily-loaded tour, the dedicated touring frame is the undisputed king of the cobblestones. It prioritises stability and durability above all else. If your tour involves more “credit card touring” (less gear), faster-paced days, and you value off-road agility, a well-chosen gravel bike can be a competent, albeit harsher, companion.
The Hydration Error That Causes Severe Alpine Leg Cramps
You’re halfway up a glorious Alpine pass, the sun is beating down, and suddenly your quad seizes. The pain is excruciating, and it brings you to a dead stop. This isn’t a sign of poor fitness; it’s a classic symptom of a critical hydration and electrolyte error. The mistake isn’t just about not drinking enough water; it’s about not understanding the science of metabolic pacing. Your body, under the strain of climbing for hours, is sweating out not just fluid, but essential minerals like sodium, potassium, and magnesium.
The common error is “camel-ing up”—chugging a litre of plain water at the bottom of a climb. This can actually be counterproductive, as it can dilute the electrolytes remaining in your system. The correct strategy is to start hydrating with an electrolyte drink 90 minutes *before* you begin the main ascent, taking small, consistent sips. This pre-loads your system. During the climb, you must continue to sip your electrolyte drink, aiming to match what you’re losing through sweat. It’s also about fuelling. As one expert from the Adventure Cycling Association notes, the link between energy and morale is profound.
On a recent tour, I underestimated the effort required to climb back over the mountains and found myself becoming super negative. When I finally made it to a small mountain town and ate lunch, I was a new person and all the joy came back to the trip.
– Adventure Cycling Association, The Gear You Need to Get Started Bike Touring
This highlights the severe mental impact of an energy deficit, which is directly linked to poor hydration and fuelling. To prevent this, you should supplement your drinks with real food. Carrying bananas or even boiled potatoes in your pannier provides a fantastic source of natural potassium. Stopping for a salty snack in a village isn’t a luxury; it’s a critical part of your cramp-prevention strategy.
Ultimately, Alpine cycling is a game of management. You are managing your energy, your fluid levels, and your mineral balance. Neglecting any one of these, especially electrolytes, is a surefire way to find yourself stranded on the side of a beautiful but unforgiving mountain road.
When Is the Safest Time of Day to Tackle Narrow Alpine Ascents?
Choosing the right time to begin a major climb in the Alps isn’t just about avoiding the midday sun. On the narrow, winding roads that characterize many European mountain passes, your timing is a critical safety decision. The primary hazard isn’t just your own fatigue; it’s the volume and behaviour of other road users, particularly tourist traffic and local delivery vehicles. The “dawn patrol” strategy—starting your climb at or just after sunrise—is the gold standard for a reason.
Early in the morning, the roads are quiet. You’ll likely only share them with the occasional local heading to work. This gives you the freedom to use more of the lane, find the best gradient, and maintain a steady, uninterrupted rhythm. You can focus entirely on your effort without the stress of cars, campervans, and motorcycles queuing impatiently behind you. This is especially vital on narrow ascents with blind corners and no shoulder.
Conversely, attempting a major climb in the late morning or early afternoon puts you in direct conflict with peak traffic. As traffic pattern studies indicate that tourist descent traffic peaks between 11 AM and 3 PM, you’ll be cycling uphill against a steady stream of vehicles coming down. Drivers descending are often focused on the road ahead, may be travelling too fast, and are less likely to anticipate a slow-moving, heavily-laden cyclist. This creates a dangerous and stressful environment. By the time you reach the summit, you’ll be exhausted not just from the climb, but from the constant vigilance.
By getting the day’s main challenge done before most tourists have finished their breakfast, you not only ensure a safer, more peaceful ride but also give yourself the entire afternoon for a leisurely descent and recovery. You can take your time, enjoy the views, and arrive at your destination with energy to spare.
In What Order Should You Schedule Muscle-Intensive Activities?
As a tour progresses, managing fatigue becomes a complex puzzle. It’s not just about total effort, but the *type* of effort and when you demand it of your body. Planning your day—and your week—around how your body’s systems perform is an advanced tactic that separates seasoned tourers from suffering beginners. You need to think about more than just your leg muscles; you need to consider your Central Nervous System (CNS).
Your CNS governs coordination, reaction time, and fine motor skills. It’s freshest in the morning. Therefore, any activity requiring high technical skill should be scheduled early. If your route includes a tricky gravel descent or a section of singletrack, tackle it in the morning when your mind is sharp and your reactions are fastest. Trying to navigate a technical trail in the late afternoon when you are mentally and physically fatigued is a recipe for a costly mistake.
Similarly, your body’s glycogen stores are at their peak mid-morning. This is the ideal time for short, intense anaerobic efforts like steep hill sprints or fighting a block headwind. In the afternoon, your body is better primed for long, slow, aerobic work. This is the time for those long, flat, or gently rolling sections where you can settle into a steady cadence for hours. Brute-force activities, like a long carry of your gear up to a remote campsite, are best left for the evening when mental sharpness is less critical. As expert tourer Steve Bozzone points out, this level of planning is about matching expectations to reality.
There are two poles of bike touring… Some riders have time restrictions while others want freedom to declare rest days. Understanding where you fall on this scale is important for setting expectations with riding partners and affects the entire group dynamic.
– Steve Bozzone, Bike Touring Primer & Beginner’s Guide
This means your activity schedule must be flexible. If you and your partner are feeling wiped out, it might be smarter to swap a technical morning for a simple aerobic afternoon and save the challenging section for another day. This strategic sequencing helps prevent both physical injury and mental burnout over the course of a multi-week tour.
E-Bike Tours vs Minibus Excursions: Which Offers a Better Tasting Pace?
While your goal might be a self-supported pannier adventure, it’s worth understanding the concept of “pacing for experience,” a lesson perfectly illustrated by the rise of e-bike touring. This isn’t about taking the easy way out; it’s about modulating effort to enhance sensory immersion. When you’re planning a rest day or a detour to a winery in the Loire Valley, the choice between a minibus tour and an e-bike reveals a lot about the touring philosophy.
A minibus tour is passive. You’re shuttled from one viewpoint to the next in an air-conditioned bubble, disconnected from the landscape you’re meant to be experiencing. It often leads to sensory overload, with too much packed into too short a time. An e-bike, however, keeps you in the environment. The electric assist doesn’t eliminate effort; it controls it. You can flatten a challenging hill into a gentle slope, allowing you to maintain a “tasting pace”—slow enough to smell the lavender fields, hear the birds, and feel the sun on your skin, all without redlining your heart rate. This mild exertion builds a genuine appetite and appreciation for the food and wine you’re there to sample.
This is particularly relevant for tourers of differing abilities. As industry observations show that e-bikes are making cycle touring possible for a wider range of people, they serve as fantastic equalizers. A fitter rider can stick to their acoustic bike while their partner uses an e-bike, allowing both to enjoy the same route at the same pace without frustration or compromise. The e-bike simply removes the potential for suffering, leaving only the enjoyment.
The table below compares the sensory experience of these two approaches, highlighting why controlling your pace is key to a richer travel experience.
| Factor | E-Bike Tours | Minibus Tours |
|---|---|---|
| Physical Engagement | Mild exertion builds genuine appetite | Passive, risk of sensory overload |
| Access to Producers | Narrow vineyard tracks, family farms | Main roads, commercial wineries only |
| Sensory Immersion | Smell, sound, temperature variations | Air-conditioned isolation |
| Pacing Control | Personal, flexible stops | Rigid group schedule |
Key Takeaways
- Your existing fitness is for single-day efforts; long-distance touring requires a focus on managing cumulative stress and allowing for gradual adaptation.
- Weight distribution is a dynamic skill. A 40/60 front-to-rear split is a good start, but it must be adapted for climbs and descents to maintain stability and control.
- Strategic pacing is everything. This includes starting climbs early to avoid traffic, scheduling technical sections for the morning, and using tools like e-bikes to modulate effort for maximum enjoyment.
How to Plan a 14-Day Outdoor Activities Road Trip Across the Scottish Highlands?
While your sights are set on the continent, the strategic mindset required to plan a complex tour is universal. A 14-day trip through the notoriously unpredictable Scottish Highlands provides a perfect template for planning your European adventure. The core challenge is the same: how to build a flexible itinerary that can handle variable weather, challenging terrain, and the need for both progress and rest. A “hub and spoke” strategy is far superior to a linear “A to B” plan for a first major tour.
Instead of trying to ride a new segment every single day, you establish 3-4 “base hubs” for 3-4 nights each. For a tour in Provence, this could be towns like Avignon, Apt, and Forcalquier. From each hub, you can do “spoke” rides—day trips without luggage that explore the surrounding area. This model gives you incredible flexibility. If the weather is terrible, you can take a rest day without falling “behind schedule.” If you discover a fantastic local market, you can adjust your plans to revisit it. This approach reduces the daily pressure of packing up and moving on, which is a significant source of tour fatigue.
This planning philosophy also encourages starting small. As WillCycle wisely suggests in his beginner’s guide, getting to know your gear and your body’s touring rhythm close to home is invaluable. A shakedown trip in the UK is not a step back; it’s a vital dress rehearsal.
When you start bicycle touring, it makes sense to keep it fairly local for your first bike tour. When new to cycle touring, consider following a known route.
– WillCycle, Cycle Touring – A Guide For Beginners
Use this shakedown trip to test the hub and spoke model. Plan for contingencies. What’s your Plan A for a perfect day? Plan B for a misty, damp day? And Plan C for severe weather (a museum visit or a long lunch)? Applying this structured yet flexible thinking to your European tour will transform it from a rigid march into a responsive and enjoyable adventure.
Action Plan: Your First Two-Week Tour Template
- Hub Selection: Identify 3-4 “base” towns along your general route that will serve as multi-night stops.
- Contingency Planning: For each hub, create three ride options: Plan A (the ambitious, perfect-weather loop), Plan B (a shorter, less exposed route), and Plan C (a non-cycling activity).
- Accommodation Booking: Book your hubs in advance but leave the days between them flexible for spontaneous stops or to account for slower/faster progress.
- Midge/Mosquito Check: For summer tours in areas like the Camargue or Scottish lochs, check local insect seasons and book accommodation away from still water.
- Shakedown Trip: Plan a 3-day “mini-tour” in the UK using this model to test your gear, pacing, and planning system before you commit to Europe.
Your first European bike tour is a monumental undertaking, but the primary challenges are mental and strategic, not physical. By shifting your mindset from raw power to intelligent pacing, from packing lists to load dynamics, and from a rigid schedule to a flexible strategy, you equip yourself for success. Now, the next logical step is to plan a weekend shakedown trip in the UK to put these principles into practice before you cross the Channel.